D.I.Y. - No Sew Wallet and Pocket Organizer
-
This is a Do It Yourself project that requires no sewing.
This was designed for a friend who wanted to make his own wallet and pocket organizer custom to his needs, do to physical impairments he needed a non-sewing design.
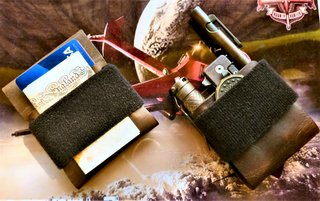
A laser cutter machine was used to cut the design out in leather.The photo below is my finished result.
MATERIAL LIST
-
11 x 6 inch of 4 – 5 oz. Leather
-
3 feet of 1.5 inch Velcro brand One-Wrap
-
Sharp X-ACTO knife or Laser Cutter machine
-
Leather dye color of your choice
-
Leather conditioner of your choice
ASSEMBLY STEPS
[list type=decimal]-
Trace the pattern or patterns onto your leather.
-
Cut-out the leather following your traced lines.
-
Dye the leather with your choice of color following the dye manufactures directions.
-
Seal the leather with leather conditioner following the manufactures directions.
-
Assemble the project(s) with Velcro One-wrap and trim as needed.
When assembling your pocket organizer place the EDC item in each slot as you thread and tighten the One-wrap thru the leather slots.
Below examples of how the wallet and pocket organizer could be wrapped using the 1.5” One-wrap.
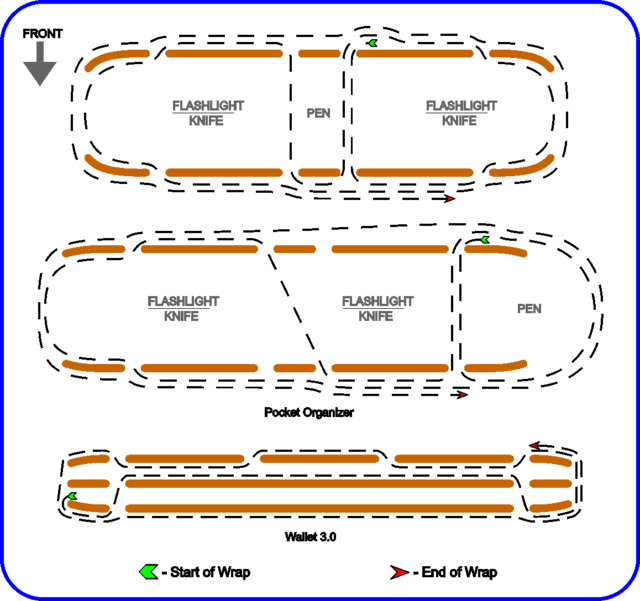
The wallet and organizer pattern is shown below.
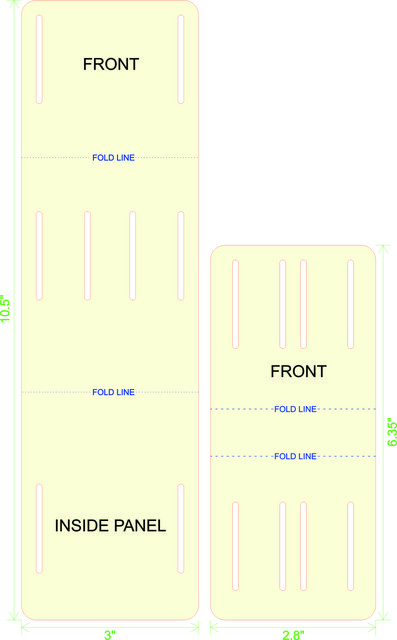
Full size downloadable pattern LINK https://i.postimg.cc/0vt40ZSt/No-Sew-Wallet-and-Pocket-Organizer.png. -
-
-
-
-
-
-
-
Nice design! Looks great
-
@kottskrapa said:
Nice design! Looks great@kottskrapa, Thank you for the kind words!
-
-
@PitCarver said:
Really like the no sew aspect but the layout confuses me. (I'm old and many things do, these days.)
Still , an awesome project.@PitCarver, Thank you for kind words and input!

I will try to give some clarification:
The design layout are two different items, the short leather piece is a pocket organizer folded taco style with the one-wrap threaded thru the slots to make the compartments.
The longer leather piece is folded into it's self to create a top and side pockets. The side pocket can be access from the left side or right side depending which way the one-wrap is threaded thru. I attached another example of how one can thread the wrap. To access the side pocket you would pull back the one-wrap to expose the side compartment, keep those item(s) in that pocket secure until needed.
The green is where you start your wrap ending at the red indicator, but this is suggestions as there are many ways it can be threaded to create the usefulness one would want.
The reason my friend needed a side pocket is for his pocket medi-kit that he carries.
Another option for the wallet is to cut at the bottom fold line and just have a top card pocket, to create a very slim wallet.
An engineer, architect or designer always understands their idea, the tricky part is explaining it to everyone else...for me it is much easier for me to explain in person.







Hello! It looks like you're interested in this conversation, but you don't have an account yet.
Getting fed up of having to scroll through the same posts each visit? When you register for an account, you'll always come back to exactly where you were before, and choose to be notified of new replies (either via email, or push notification). You'll also be able to save bookmarks and upvote posts to show your appreciation to other community members.
With your input, this post could be even better 💗
Register Login